What is holding you back from making a change that could benefit your company / organization? With Hostek you can have a custom solution that achieves your company requirements and goals.
Our server sales engineers can assist with finding the right solution for you by scheduling a consultation. During this consultation we’ll assess your company needs, requirements, goals, etc. and give you our best recommendation for a custom platform solution.
Finding this custom solution for your company is the easy part. After a plan of solution is put in place, we often see some hesitation due to the needed migration in order to achieve this solution. There is the fear of something going wrong during the migration.
This guide is here to give you our top 5 recommended steps to make this migration seemingless, as the migration doesn’t have to be hard or painful.
Step 1: Prevent DNS Propagation Issues
The absolute BIGGEST frustration we see from customers is the time it takes for the site to actually start resolving to the new server.
“My site(s) already been migrated over… why does it have to take up to 24 hours for propagation to complete?”
In the meantime traffic could be going to the old server and there could be discrepancies between the old server and new server, such as orders being placed in your old database server while other orders are being placed on the new database server.
The above example, obviously, would not be ideal. I’d like to explain an easy fix to preventing this frustration.
To prevent long DNS propagation times we can actually change the TTL within our existing site(s) DNS records.
What is this TTL Record? The TTL stands for Time To Live and is part of each and every DNS Zone Record.
An example of DNS Records are below:
| Type | Name | Value | TTL |
|---|---|---|---|
| A | servermanagementco.com | 12.34.56.78 | 86400 |
| A | www.servermanagementco.com | 12.34.56.78 | 86400 |
| A | mail.servermanagementco.com | 12.34.56.78 | 86400 |
| MX | servermanagementco.com | mail.servermanagementco.com [pref 10] | 86400 |
Within the above DNS Zone for the domain ‘servermanagementco.com’ you’ll notice the TTL is currently set to ‘86400’.
What this means is every DNS server resolver that has accessed this sites DNS Records is caching the results of those records for 86400 seconds.
86400 seconds is exact 24 hours, so that is how long it would take for this domain to propagate for any DNS Resolvers that have NOT accessed this site. There may be some DNS Resolvers that have not accessed the site, so if you change the DNS to point to another pair of name servers then you may see mixed results… where those that are cached will display the old DNS information and those that have not accessed the sites DNS will pull information from the new DNS records for the domain (new server location).
As you may be able to guess where I’m going with this, we recommend that for migration purposes you temporarily change the TTL for all your sites records to ‘300’, which is the equivalent to 5 minutes.
This means that from the moment you change over your DNS your site will began propagating within 5 minutes instead of the 24 hours that was set earlier.
See the below table that shows the TTL record updated to 300 seconds (5 minutes):
| Type | Name | Value | TTL |
|---|---|---|---|
| A | servermanagementco.com | 12.34.56.78 | 300 |
| A | www.servermanagementco.com | 12.34.56.78 | 300 |
| A | mail.servermanagementco.com | 12.34.56.78 | 300 |
| MX | servermanagementco.com | mail.servermanagementco.com [pref 10] | 300 |
It is recommended that you wait until the previously allotted TTL time to began the DNS transfer for the domain. So if you previously had the TTL set to ‘86400’, then we recommend waiting 24 hours before starting the migration… because for the next 24 hours any DNS Resolver that has accessed the sites DNS records won’t have the new TTL setting you just updated. Once the ‘86400’ seconds has passed then any DNS Resolver will start seeing the TTL time as your newly adjusted amount (300 seconds).
Step 2: Obtain All Pre-Migration Information
This may seem like an obvious suggestion, however we strongly encourage that you obtain all the information below PRIOR to scheduling the migration to be done:
-
Access to each websites domain registrar, where you can update the name servers for the domain to point to our name servers right after the migration has completed.
If you are instead keeping the domains DNS hosted with the same provider and are instead updating the A Records directly to point to the new server IP Address, then you only need to obtain access to the location the sites DNS Zones are stored so that you can update the A Records, MX Records, etc. once the migration is complete.
-
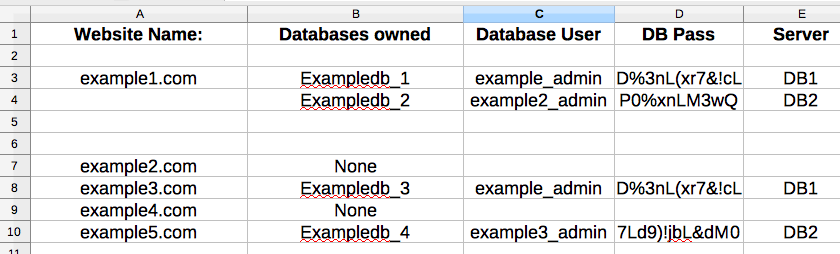
Complete list of all domains, along with any databases that they have associated with them (so we can also make sure they are added in the control panel for easier management).
Example of a great way to record this information is to use an excel sheet and store the databases owned by each website, along with the username and passwords (and any DSNs if DSNs are presently used on the site), as shown in the screenshot below:
-
Complete list of credentials for EACH server that needs to be migrated.
-
If Windows, then providing full RDP access to the server will allow our team to have the information needed to login to perform the migration.
-
If Linux/cPanel, then providing full SSH & WHM access will allow our team to have the information needed to login to perform the migration.
-
If using Microsoft SQL, then providing access to an Administrative SQL user will allow us to perform the migration for any Microsoft SQL Databases.
-
If using MySQL, then providing access to a user with full access to the MySQL instance will allow us to perform the migration for any MySQL Databases.
-
If any sites have dedicated SSL certificates you will want to obtain the certificates in PFX Format (.pfx). The .pfx file contains both the private and public SSL key so it can easily be imported into the destination server.
Note: If you are providing our team with full access to the server (such as RDP), then our team will have the access needed to obtain this .pfx file to get the SSL moved over to the new server.
-
Obtain any other helpful information and credentials that might be needed, such as any passwords to applications that need to be accessed on the source (old) server in order to move data over to the destination (new) server.
Step 3: Schedule Migration via Migration Team
Steps 1 & 2 involved you having to update the TTL for faster propagation time, as well as collecting all the needed information for the migration.
Now that these task have been completed it is time to pass the responsibility to our migration specialist so they can do what they do best: Getting your site(s) moved over and testing functionality.
We recommend that you schedule this with our team via the special on-boarding e-mail address provided in your account information e-mail, or by submitting the request via the ticketing system directly within your billing control panel.
For larger servers, we strongly recommend that you schedule between 5-10 sites at a time instead of requesting all sites to be done at once. Here is our reason why:
-
The first reason is priority. Most clients we’ve migrated have had a large amount of sites, however they had a few sites that fell under much higher priority. If providing us the top 5 or 10 priority sites we can get those migrated over with higher priority and have focus on those individual sites, instead of all sites as a whole.
-
Secondly, being able to set a schedule when 5-10 sites are going to be migrated means the site owners for those 5-10 sites will know when to be available to update the DNS to point to the new servers. If doing all the sites at a single time, then it could take longer and some sites may not be updated in a timely manner… resulting the discrepancies between the old and new server files / databases.
Again, to schedule these migrations you can work with our team by using the on-boarding address provided within the account information e-mail, as well as you can submit the request directly within the billing control panel via the ticketing system.
For the request we recommend that you give us a spreadsheet, as we went over in step 2, of the domains you’d like to focus on for the migration. In the request we’ll also need the access points (IP Addresses, credentials, etc.) to the existing servers.
We recommend that you give us a preferred time to start the migration so we can get this planned. We most likely will be available to do the migration at any time that is needed, as we are 24/7 and have our premium/on-boarding technicians available. This will depend on if there is any other customer migrations that are being performed during that time frame that is suggested. Our team will confirm the date / time and get this scheduled and work with you on any further information that might be needed.
Step 4: Our Team Performs Migration
Once the migration is scheduled, as per Step 3 of this article, we will then conduct the migration at the time slot chosen for the migration to start.
During this migration we’ll perform each site individually and will perform the following:
Windows
-
Copy over the site files FROM the source server TO the destination server using an FTP application that supports MFMT (Modify File Modification Time), so that timestamps on files will remain in place and not contain the date of the migration.
Note: Our team may need to install an application such as FileZilla server on the source server, if it’s not already installed.
-
We’ll then do a file level migration of the e-mail from the previous smartermail instance on the source server over to the new server, so that e-mail is moved over for the domain as well. We’ll rename the directory for the mail on the source server and then remove the domain from SmarterMail directly on the old (source) server and create a incoming gateway for the domain so that any e-mails sent to that domain on the old server automatically get forwarded to the new (destination) server (prior to even updating the DNS).
Note: If you are using a different mail solution than SmarterMail then we recommend speaking to our team within the migration ticket for the best solution for migrating the e-mail.
-
We will then perform the database migration, which we’ll perform by taking a FULL backup on the source server and moving this over to be imported into the new destination server. We’ll also take this time to setup any DSNs that was provided in the document we talked about earlier, so that any database connections referencing the DSN will work properly.
Note: Our team can also update the DSN(s) on the source (old) server if desired, so that the live site immediately starts using the database on the new server you have with us. Until you have the website pointing to the server with us you may experience a slower connection to the database on your sites since traffic will be going over the public network, rather than the internal / private network directly on our servers. However this can help prevent any discrepancies in the database, so this is definitely something worth thinking about. Once the site is live on our servers traffic to the database will be done through the internal / private network instead of via the public, so the (very small) potential latency would be for very minimal time.
-
We’ll then perform a re-migration of the site files for any changes, including any new files that are added or any files that have a newer modified / date timestamp.
-
Next, we will test the sites by updating our own local host file so that we can test the sites live on the new server prior to updating any DNS. Once we confirm everything is working as expected we will respond to the migration ticket confirming the site that has been migrated is working and for you to update the DNS (unless we have access to the DNS, at which point we’ll go ahead and perform).
Linux/cPanel
-
If moving from another Linux/cPanel server to a Linux/cPanel server with us, then we’ll perform the migration using the built in cPanel Transfer Tool.
This migration tool will automatically pull the account form the previous source (old) server including the site files, databases, e-mail, etc.
or
-
If moving from a Windows server to Linux/cPanel with us then we’ll follow steps 1 & 3 from the windows migration steps mentioned above.
-
Next, we will test the sites by updating our own local host file so that we can test the sites live on the new server prior to updating any DNS. Once we confirm everything is working as expected we will respond to the migration ticket confirming the site that has been migrated is working and for you to update the DNS (unless we have access to the DNS, at which point we’ll go ahead and perform).
Step 5: Post Migration - Test Sites & Update DNS
After the sites have been migrated we (Hostek) will test functionality of the site on the new server. To do so we’ll update our own local computers ‘Hosts File’ so that we can bypass DNS lookups for the domain and view the website hosted directly on the new server. You can do this yourself as well by updating your own computers host file to point the site to the new server for testing.
When updating the host file and testing the site we test the home page, several links (in navigation menu), as well as we look for pages that seem obvious to have database connectivity so we can ensure the database is connecting properly as well.
The migration process (at least for that batch of websites) should now be complete. If we (Hostek) do not have access to your sites DNS records, then we’ll instruct you to perform those changes to your DNS right away.
If you updated your sites TTL as recommended in Step 1, then you should see the site updated and pulling from the new server within 5 minutes.
We recommend using a tool such as WhatsMyDNS, so that you can see what IP your site is resolving to around the world.