This topic will show how to manage your website(s) ASP.net settings via the WCP control panel.
Managing ASP.net Settings via WCP
-
Login to your WCP control panel.
Note: You can view our topic on logging into WCP if you need help with this step.
-
Once logged in if you are not already on the domain in questions control panel page then click on the ‘Hosted Domains’ drop-down from the top of the pages navigation bar. Then select the desired domain from the drop-down.

-
You will then click on the ‘ASP.net Settings’ Icon.

-
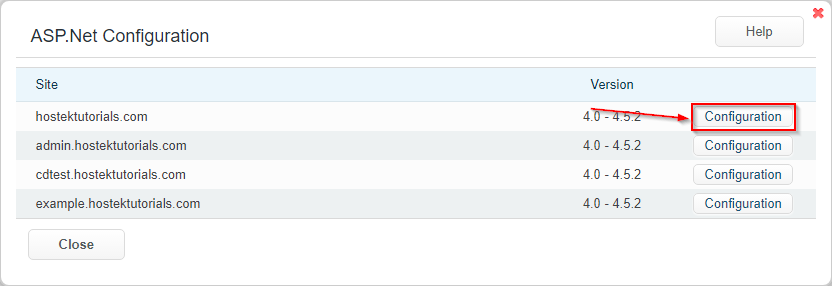
If you have any sub-domains setup then you’ll be requested to choose which site you wish to manage the .net settings for as shown in the screenshot below.
Click ‘Configuration’ next to the desired domain you wish to update these settings for.
-
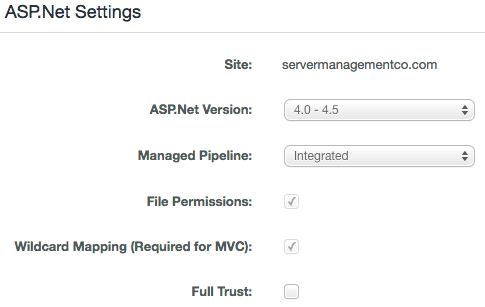
You will then be presented with multiple configuration options to configure.
Note: Listed below the screenshot are explanations of each option.

-
Site: This field is self-explanatory. This will list the site name that is currently being configured.
-
ASP.Net Version: This field allows you to choose between 2.0/3.5 and 4.0/4.5.2 versions of ASP.Net.
-
Managed Pipeline: Allows you to choose which pipeline to use for ASP.net (Classic or Integrated).
-
Integrated: The IIS pipeline is integrated with the ASP.net request pipeline. The ASP.net service is no longer treated as an external plugin but as a part of IIS.
-
Classic: In this mode IIS will only interact with ISAPI filters and extensions. ASP.net acts as an ISAPI filter and is treated as an external plugin by IIS.
-
-
File Permissions: This is a legacy setting for 2003 servers. This can be disregarded.
-
Wildcard Mapping (Required for MVC): This settings is used to configure a wildcard handler to intercept every request before being routed to the extensions specific handler.
-
Full Trust: Gives the asp.net application the same permissions as the user assigned to the site rather than the more limited permissions allowed by the asp.net medium trust security policy.
-
When finished updating the configurable options for your ASP.net settings click the ‘Save’ button to save your changes.

