This topic will show how to setup a new e-mail user within your IOS iPhone or iPad device(s). We’re working on a video for this topic, but for now you can view the step by step instruction guide found below:
Adding Mail Account:
Let’s show how to first add the mail account to your iPhone. We’ll then show how to ensure its configuration settings are correct.
-
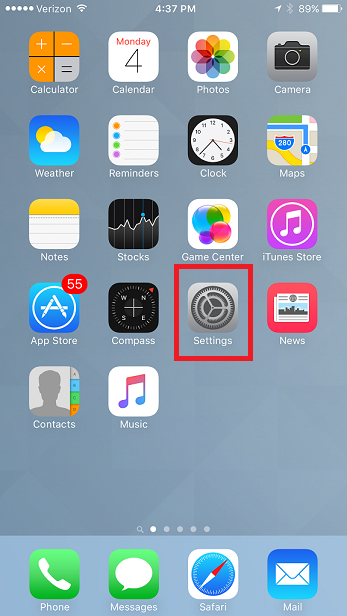
On your iPhone click on the ‘Settings’ icon (looks like a gear symbol).
-
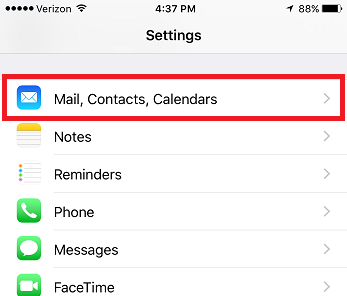
Then scroll and select the option for ‘Mail, Contacts, Calendars’.
-
You should now click on ‘Accounts’ to go into the different available mail account options.

-
You should now see a list of existing accounts ( if any ). Click ‘Add Account’.

-
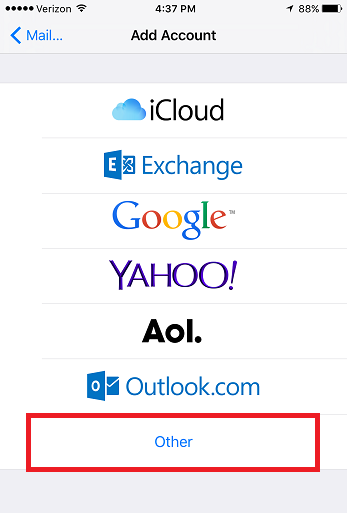
Now choose the option for ‘Other’.
-
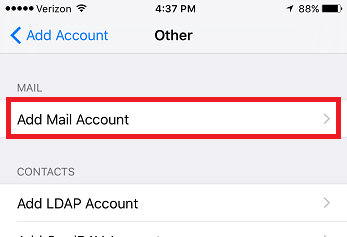
For the account type choose ‘Add Mail Account’.
- Now enter in the account information including:
-
Name: The name recipients see as the ‘sender’ when you send them mail. Also known as the ‘Display Name’.
-
Email: The e-mail user you are trying to connect your mail to your iPhone with.
-
Password: The password used for the e-mail user your connecting to your iPhone with.
-
Description: The name that you see for your mail account when you go to the ‘Mail’ application on your phone.
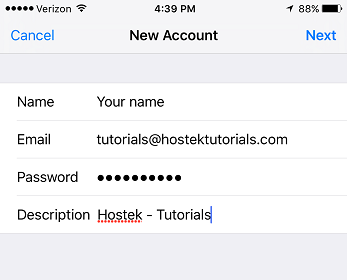
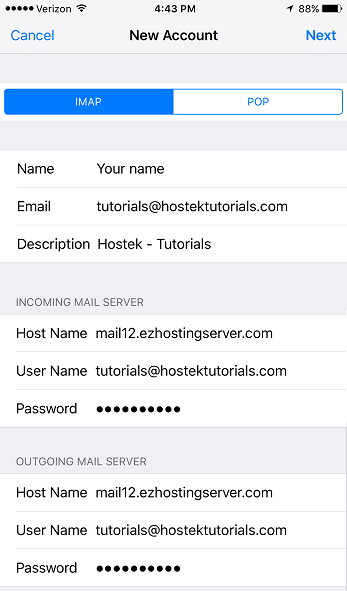
- Click ‘Next’, then enter in the specific incoming and outgoing server settings for the e-mail user.
-
If you are on our shared hosting platform then for the Incoming and Outgoing host name you can use the pre-propagation mail address that is provided in your account information or within your control panel.
- You can also use any domain or subdomain that you have pointing to the IP Address of your mail server ( such as mail.hostektutorials.com ).
-
Enter in the full e-mail user address such as tutorials@hostektutorials.com for each of the ‘User Name’ fields.
-
Double Check that you entered the correct password into each of the ‘Password’ fields.
-
Once you click ‘Next’ the mail account should then be added.
Note: If it takes a minute to add and this says it could not connect continue through steps as it automatically attempts connecting with SSL enabled and you may just need to set it to set this mail account to use non-ssl settings for the hostname you’re using with your e-mail account.
Go back to the ‘Mail Accounts’ section of the settings and proceed to step 9.
-
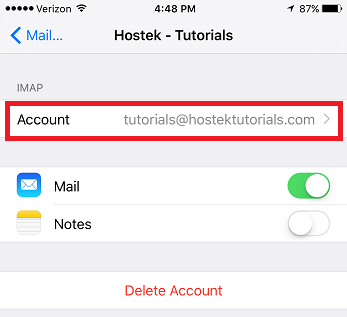
Now click on the mail account you just added so we can edit the settings of that account.

-
Choose the account again.
Note: Make sure that the ‘Mail’ setting is enabled on this page.
-
Now that we are in the settings for this user account click the option for ‘SMTP’ under the outgoing mail server section.

-
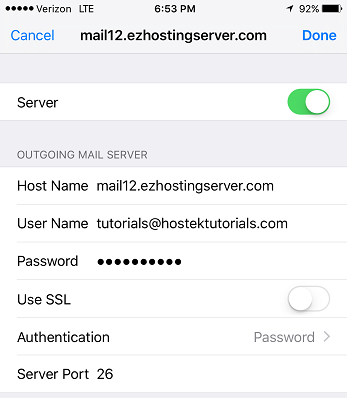
We can now edit the outgoing server settings. By default ‘SSL’ is enabled. We will provide the settings to use below for SSL and non-SSL.
Non-SSL:
-
Host Name: If your domains ‘mail.yourdomain.com’ DSN record is pointing at the correct mail server you can use this for the Host Name. Otherwise you can use the pre-propagation address provided in your account information e-mail and control panel.
-
User Name: The e-mail user your authenticating as (The address your setting your mail up for).
-
Password: The password to the e-mail user your authenticating as.
-
Use SSL: Turn OFF
-
Authentication: Choose ‘Password’ as the authentication type.
-
Server Port: 25, 26, or 587 (Port 25 is commonly blocked by ISPs due to spam issues. Not recommended.)
WITH SSL:
-
Host Name: If you have your own SSL installed for mail on your domain then you can use the domain name here that has the SSL installed for the mail service. If on our shared servers and don’t have a dedicated SSL you will need to use the shared hostname of the server that we have an SSL installed on. For example if you’re on our shared Mail12 server the hostname would be ‘mail12.ezhostingserver.com’.
-
User Name: The e-mail user your authenticating as (The address your setting your mail up for).
-
Password: The password to the e-mail user your authenticating as.
-
Use SSL: Turn ON
-
Authentication: Choose ‘Password’ as the authentication type.
-
Server Port: 465
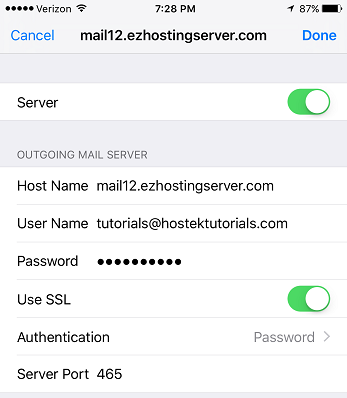
Click ‘Done’ once you enter the correct SMTP information.
-
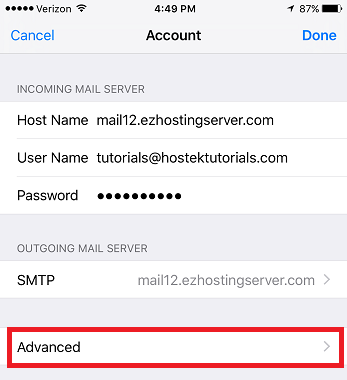
Now that we’ve updated the SMTP settings go back to the ‘Account Settings’ and click ‘Advanced’ so we can update the incoming settings.
-
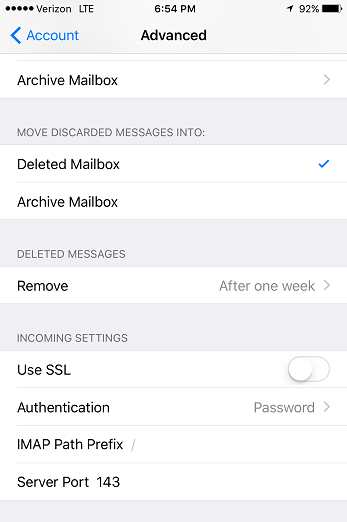
We can now edit the incoming server settings. By default ‘SSL’ is enabled. We will provide the settings to use below for SSL and non-SSL.
Non-SSL:
-
Use SSL: Turn OFF
-
Authentication: Choose ‘Password’ as the authentication type.
-
POP Server Port: 110
-
IMAP Server Port: 143
WITH SSL:
-
Use SSL: Turn ON
-
Authentication: Choose ‘Password’ as the authentication type.
-
POP Server Port: 995
-
IMAP Server Port: 993
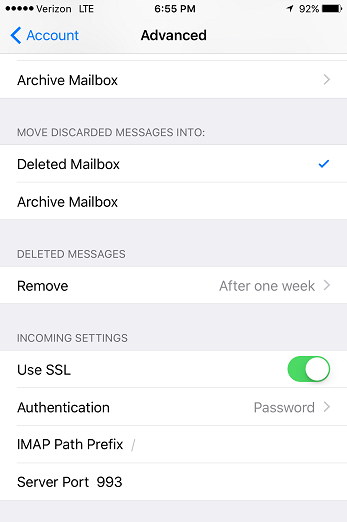
- Click ‘Done’ and you should be all set. You should now be able to send and receive mail using the ‘Mail’ application. You should see the new email account in the list of active email accounts ( It will show up under the description name you provided earlier ).