WordPress: Manual WP Cron Jobs
This is a brief guide on how to implement the wp-cron.php process without using the native WordPress Cron job settings, and to instead use the control panel to initiate the process.
Before we dive in, I think that it is important to understand why this would be a good idea to implement and how it can help the system as a whole operate more smoothly.
-
The wp-cron.php is a file that essentially processes a catalog of automated tasks like publishing scheduled posts, checking for updates, sending notifications per code specific triggers, etc…
-
The WordPress environment is configured to process this based on when their site receives a visitor. While for the most part, this default setting is nothing to worry about, in higher traffic sites the wp-cron.php processes can become overbearing for any server environment, whether Shared or VPS.
-
To fix issues with resource abuse that can be identified to the wp-cron.php file (you can generally locate this in the access logs) you will first need to instruct the WordPress application that it shouldn’t process the wp-cron per its default configuration.
To do this you will need to navigate to the WordPress site’s root directory and locate the wp-config.php file:
-
Open the wp-config.php file
-
Go to the bottom of the database settings section and add the following:
define('DISABLE_WP_CRON', true); -
Finally, click “Save” to implement the definition.
You will need to implement a cron job to initiate the scripts in the wp-cron.php. Generally having the wp-cron.php script run once every 6 hours is acceptable, but you can make further adjustments as needed.
Manual WP Cron Jobs In cPanel
For the cPanel environment, please follow these steps:
-
Login to the cPanel control panel
-
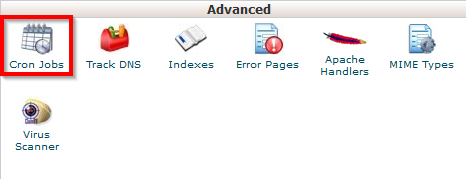
Locate and Select the “Cron Jobs” button under the Advanced category.
-
Now in the “Hour” drop-down menu, select Every Sixth hour
-
Next, you will need to add the following code to initiate the wp-cron.php file. Note: You will need to replace ‘domain.com’ with your domain.
wget -q -O - http://domain.com/wp-cron.php?doing_wp_cron >/dev/null 2>&1Note: Replace the “username” with the actual cPanel username, so that the file path is accurate.
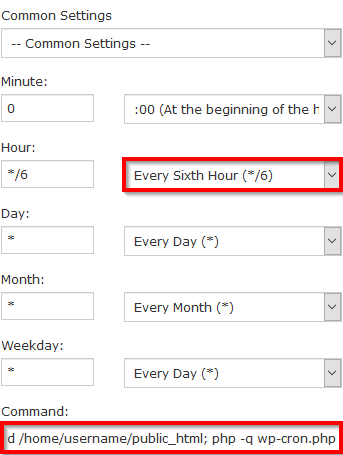
-
Finally, click “Add New Cron Job” and you are done.
Manual WP Cron Jobs In WCP
For WCP follow these steps:
-
Login to the WCP control panel
-
Locate and Select the “Cron Jobs” button under the “reporting and applications” category for
Windows Shared products but under the “ColdFusion” category for ColdFusion Shared products.
-
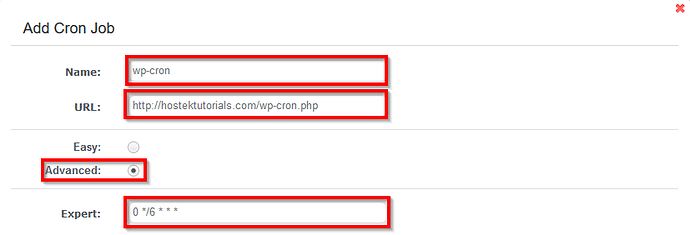
Next select “Add” and then name the Cron Job: “wp-cron” would generally be sufficient.
-
Now include the URL to the cron file, which should look something like this:
http://domain.com/wp-cron.php -
Next, select the “Advanced” radial and input the following in the “Expert” field
0 */6 * * * -
Finally, click “Save” to implement the cron to initiate the wp-cron.php script every 6 hours.
Note: One thing to remember is to always ensure that your file path is accurate to the specific WordPress application. Very often web administrators will install their WordPress in a subdirectory. Before the work is considered “complete” make sure that the file path is accurate.
