PHP is a widely used and very powerful scripting language with built-in functions, including sending e-mail. Still, at its core PHP does not have the ability to send e-mail through a specific e-mail sending server via SMTP authentication.
Luckily, there is a huge community built around PHP since it is open source and there are PHP libraries (extensions) available for the public that allows for the use of SMTP authentication from your PHP code.
We always recommend everyone to authenticate to your domains actual e-mail server so that e-mail for your website is handled strictly from the same mail server handling your domains normal e-mail users.
We’ll explain below how to use the PHPMailer library on your website:
-
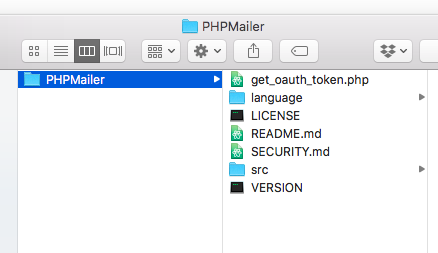
Step one is extremely easy. Simply browse to the PHPMailer Github and download the .zip file. Extract the contents into an empty folder. The root folder should be named ‘PHPMailer’, so if this name is different go ahead and rename the folder now.
Below is a screenshot showing the folder and the contents of the folder that we downloaded:

-
Now we’ll want to use FTP, FileManager, or Server Access (RDP or SSH) in order to move over this ‘PHPMailer’ folder to our sites includes ( /includes ) directory.
Note: The reason we chose the /includes directory is so that you can use this script at any location on your site rather than having to upload the PHPMailer to every directory you may be sending e-mail from on your site. If you choose to upload this PHPMailer library to a different directory than that is alright, as all you’ll need to do is update the directory the script mentioned below uses.
We have tutorials for our windows control panel (WCP) for FTP, FileManager, & RDP. If on a Linux/cPanel environment then we recommend using FileManager and you can view cPanels Guide on FileManager here.
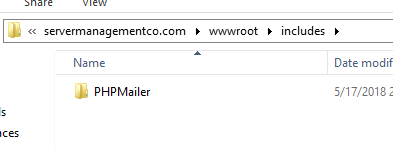
Example below showing the PHPMailer folder within the /includes directory of our site.

-
Once you have moved over the files from your local computer to the correct directory for your website it’s time to put those files to use. Open the file that you want to use to send your e-mail (this may be a contact.php file for example if a contact form).
Now within this file go ahead and add the following code:
 <?php


 // Import PHPMailer classes
 use PHPMailer\PHPMailer\PHPMailer;
 use PHPMailer\PHPMailer\Exception;

 // Load PHPMailer files
 require $_SERVER['DOCUMENT_ROOT'] . '/includes/PHPMailer/src/Exception.php';
 require $_SERVER['DOCUMENT_ROOT'] . '/includes/PHPMailer/src/PHPMailer.php';
 require $_SERVER['DOCUMENT_ROOT'] . '/includes/PHPMailer/src/SMTP.php';

 // Enable debugging
 $mail = new PHPMailer(true);

 try {
     // Debug SMTP connection
     $mail->SMTPDebug = 2;

     // Enable SMTP
     $mail->isSMTP();

     // Enable SMTP Authentication
     $mail->SMTPAuth = true;

     // Server hostname
     $mail->Host = 'mail.example.com';

     // Server username
     $mail->Username = '[email protected]';

     // Server password
     $mail->Password = 'secret';

     // Server Port
     $mail->Port = 587;

     // Enable encryption
     $mail->SMTPSecure = 'tls';


     // If connecting to a mail host with TLS/SSL
     // that doesn't have a proper certificate setup.
     /*
     $mail->smtpConnect([
     'ssl' => [
     'verify_peer' => false,
     'verify_peer_name' => false,
     'allow_self_signed' => true
     //]
     //]);
     */

     // Sender address
     $mail->setFrom('[email protected]');

     // Recipient address
     $mail->addAddress('[email protected]');

     // Enable HTML
     $mail->isHTML(true);

     // Message subject
     $mail->Subject = 'Test Message';

     // Message body (HTML)
     $mail->Body    = 'This is just a test. <b>Please disregard!</b>';

     // Message body (Plaintext)
     $mail->AltBody = 'This is the body in plain text for non-HTML mail clients';

     // Send the message
     $mail->send();
     echo 'Message was sent successfully!';

 } catch (Exception $e) {
     // Display error
     echo 'Message could not be sent. Mailer error: ', $mail->ErrorInfo;
 }
-
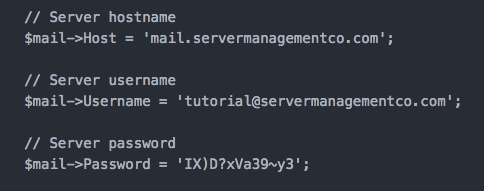
Now let’s update the ‘Host’, ‘Username’, & ‘Password’ fields to match the proper credentials in order to authenticate to our domains e-mail server.

As shown above, we have updated the fields in the mail script to attempt connecting to the server specified (hostname field) with the username and password credentials.
-
Next, let’s talk about the ‘Port’ and the ‘SMTPsecure’ settings. What you have for these two settings will depend on the type of connection you want to make. Let’s go over the different type of scenarios:
-
Scenario 1: You have an SSL installed and want to use SSL (Secure Socket Layer) encryption. In this case, the ‘Host’ field we mentioned earlier needs to be set to a domain that has an SSL installed on the mail server. If using this scenario you’d use the below settings:
// Server Port $mail->Port = 465; // Enable encryption $mail->SMTPSecure = 'SSL'; -
Scenario 2: You have an SSL installed and want to use TLS (Transport Layer Security) encryption. In this case the ‘Host’ field we mentioned earlier needs to be set to a domain that has an SSL installed on the mail server. If using this scenario you’d use the below settings:
// Server Port $mail->Port = 587; // Enable encryption $mail->SMTPSecure = 'tls'; -
Scenario 3: You do NOT have an SSL installed, or do not wish to use one. In this case, the ‘Host’ field can be whatever you desire (as long as it still points back to proper server IP). If using this scenario you’d use the below settings:
   // Server Port (Use port 25 or 26)
   $mail->Port = 26;

   // Enable encryption (comment out the SMTPSecure setting)
   // $mail->SMTPSecure = 'tls';
-
-
You can then update the rest of the available fields such as the sender address, recipient address, Subject, & Body.
Note: If sending through a SmarterMail server (such as our shared windows mail servers) with ‘Require Auth Match’ enabled, then the FROM address will have to match the same domain that you authenticated with. For example if you authenticate with an @servermanagementco.com domain then you also must keep the FROM address with that same @servermanagementco.com domain, otherwise, the e-mail will fail at the SMTP level and will not attempt delivery.
This setting is enabled by default and can be turned off upon request for dedicated servers (not shared), or you can turn this off yourself via the SmarterMail Admin settings for SMTP (under the SMTP in section).
-
You should now be able to test your e-mail script and if following the instructions above should work properly. We may also recommend consulting with your developer if the above-mentioned steps do not work.
TroubleShooting Script Failures
Hopefully just following the instructions in the above section will allow your e-mail to work properly and send from your specified mail server. However, in some cases additional troubleshooting may be needed.
To troubleshoot the reason why this is not working we recommend increasing the debugging level used by this script. To do so open up the script in question and change the following option:
        // Debug SMTP connection
        $mail->SMTPDebug = 2;
We recommend changing this to the below:
$mail->SMTPDebug = 3;
This will allow the script (the next time you attempt sending) to provide additional information including the real error being thrown behind the scenes by the PHPMailer library.
A lot of the time the error may be recognizable and you know what you need to fix in order to accomplish a proper mail connection to the destination mail server. We’ve gone ahead and provided below a few common errors / fixes that we’ve seen from this script that may be helpful to your troubleshooting:
Peer Certificate CN='' did not match expected CN=''
This is a commonly experienced error and is due to the TLS/SSL handshake failure. This could be due to entering in the hostname incorrectly in your script, so please be sure to check the hostname and ensure there is a certificate on the mail host that matches this hostname.More times than not, however this is due to the certificate being self-signed and not a valid SSL from an actual SSL vendor… or perhaps the SSL is expired or not up to the latest TLS cipher requirements. In this case you can tell your script to bypass the peer certificate warnings by un-commenting the code that we have posted again below:
        // If connecting to a mail host with TLS/SSL
        // that doesn't have a proper certificate setup.
        /*
        $mail->smtpConnect([
        'ssl' => [
        'verify_peer' => false,
        'verify_peer_name' => false,
        'allow_self_signed' => true
        //]
        //]);
        */
To remove the ‘comments’ you will just remove the /* and the trailing */. PHP uses these comments to state that anything between these two character sets is a comment and should not be executed.
By uncommenting the code above you should now be left with the following:
    $mail->smtpConnect([
    'ssl' => [
    'verify_peer' => false,
    'verify_peer_name' => false,
    'allow_self_signed' => true
The above tells the PHPMailer library to not require to ensure the SSL certificate is valid, up to date, as well as it allows the certificate to be self-signed (created by server and not a valid SSL vendor).
OpenSSL Error: Unknown Protocol
This error is also easily fixable, as this error just means that you are passing through an invalid variable for the following setting:
        // Enable encryption
        $mail->SMTPSecure = 'ssl';
The above is actually incorrect, as the correct setting is (below):
        // Enable encryption
        $mail->SMTPSecure = 'SSL';
This setting IS case sensitive. It is important to note that the ‘TLS’ version is actually lowercase, as only the ‘SSL’ version is all capitalized.
535 Authentication Failed
This error is only thrown if you pass through the wrong username / password credentials, or if you specify the wrong server ( Host ) to connect to. You’ll need to check the settings used and if needed reset your mail password.