WordPress is one of the most widely used CMS applications in the world. Its user base consists of nonprofit organizations, bloggers, etc… all the way up to larger business corporations that take advantage of the simplicity and customizability of WordPress.
WordPress is fully customizable since you can create your own custom plugins and themes to meet your company needs. If you are only in need of an already existing plugin/theme, then the odds are that you’ll find a plugin out there that is already setup to meet your needs since WordPress is used by such a huge population of the internet.
With this huge popularity comes risk, however. WordPress is commonly targeted for attacks since such a huge base of sites depend on WordPress. So we recommend keeping your WordPress plugins/themes and the CORE of WordPress itself up to the latest version. Each upgrade contains security enhancements, performance upgrades, etc… so it’s very important to keep WordPress up to date. View our guide on updating WordPress core, plugins, and themes if needed!
Are you ready to install WordPress on your site? If so, check out the manual instructions for each operating system (Windows or Linux/cPanel) below, or you can follow our guide on using the WCP Application Installer (if on Windows) to perform the upgrade manually. If you’re on our Linux/cPanel operating system then you can use ‘Softaculous’ to install WordPress easily. Softaculous is available on all our shared servers, as well as any dedicated servers that chose the add-on for Softaculous.
Installing WordPress Manually on Windows
In this section we’ll discuss how to install WordPress manually on your windows hosting platform. Please note that our custom built windows control panel has an auto-installer available that allows you to easily install WordPress.
-
The first step is you will want to obtain access to the sites directory. This can be FTP Access, FileManager Access via WCP, or RDP access.
Note: We recommend FTP or RDP access due to the number of files, as FileManager is mainly used for single file access/editing use. We’ll be needing to upload a large number of files which is best done via FTP or RDP.
-
Once you have access to the file structure for your website you’ll need to obtain the WordPress core files. To do this you can download the latest version of WordPress here or you can access the URL below to download.
Wordpress download: https://wordpress.org/download/
-
Once you have the WordPress.zip file downloaded onto your local computer go ahead and unzip (decompress) the WordPress download file into an empty folder that you create on your computer.
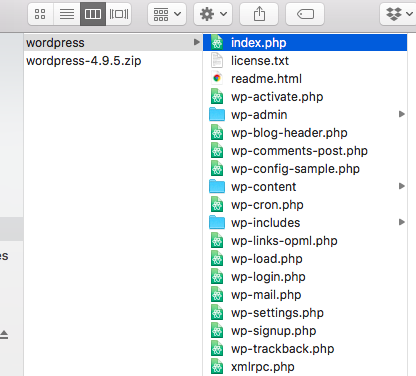
You should see all of the WordPress files and folders in the newly extracted directory, as shown in the screenshot below:
-
Now using the file structure access you obtained in Step 1, move over all of the site files for WordPress that you just downloaded (excluding the .zip file) into the folder you want WordPress installed.
For example, if you wish to host WordPress in the root directory then you would use the default /wwwroot directory on each site. If you want WordPress hosted in the /wp subfolder you could choose the ‘/wwwroot/wp’ directory for your site.
Note: Dedicated servers have the option to override the default directory, so you can find the correct default directory within the ‘Site Details’ section of the WCP control panel if needed.
-
Now that the site files are in place we need to set up the database that WordPress is going to use since WordPress is a database driven CMS software. To do so you can follow our guide on setting up a MySQL Database via your WCP control panel.
Note: Leave the database empty, as the installation we’ll perform in later steps will automatically create the WordPress tables, columns, etc…
-
Once the database is setup we need to tell WordPress how to connect to the newly created database. To do this we can rename the ‘wp-config-sample.php’ file in the WordPress installation directory to ‘wp-config.php’ and then update the following code within this file:
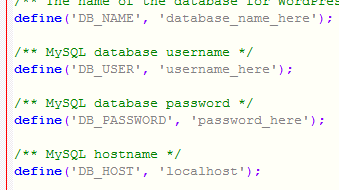
For example, if the database we created was called ‘example_db’ with the username of ‘example_admin’ and the password ‘Hg8kL;mn!dRsl&’ and this database was setup on our ‘mysql23.ezhostingserver.com’ server we could use the following (see screenshot below).
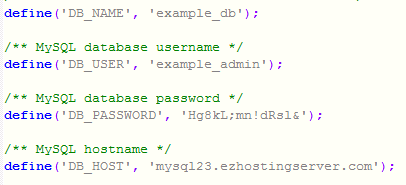
Note: The server hostname may vary depending on the server the MySQL Database is setup on. If on a dedicated server you can use ‘localhost’ if the DB instance resides on the same server as the web services, as well as you can use the VLAN IP Address (private network) to access the DB on your database server if you have the two separated.
Be sure to save your changes to the file, as well as be sure that you successfully renamed the file from ‘wp-config-sample.php’ to ‘wp-config.php’.
-
You should now be able to browse to the URL of your site that you installed WordPress in (If your site is not yet pointing to us you can update your host file for testing purposes) and proceed through the installation steps.
You will be asked for the language to use for your WordPress installation. Choose your language and click ‘Continue’.
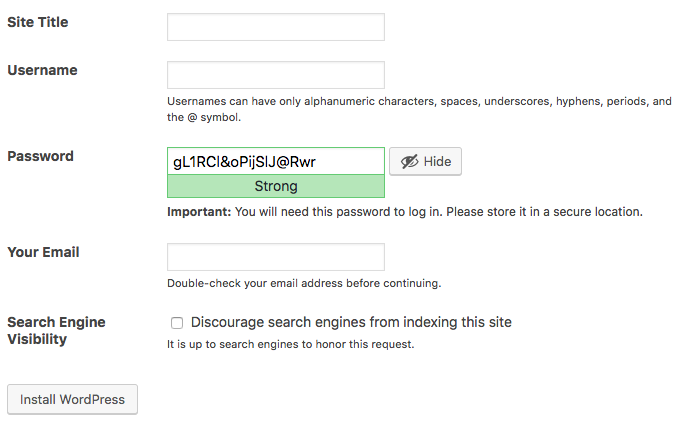
You will then be asked for the following information (screenshot below as well):
-
Site Title - The Site Title is displayed in the title bar of a web browser and is displayed in the header for most themes.
-
Username - The administrator user that will be used to login to the WordPress dashboard. We recommend using something unique and not using the common username of ‘admin’ as this can be easily brute forced.
-
Password - The password used for the administrator user. Please be sure to set a very strong password for this dashboard. You can view our guide on setting a strong password if needed.
-
Your Email - This will be the administrator email used within WordPress for sending emails such as password resets, notifications (if any plugins are set up to do so), etc.
-
Search Engine Visibility - Checking this box will add a flag to the site to discourage search engines and other crawlers from indexing the site. This is mainly used when you are not yet ready for your site to be viewable by potential clients or other types of visitors.
-
Once you fill out the form mentioned above and click on ‘Install WordPress’ then you should be ready to go! You should be redirected to a page confirming the setup was successful and a login URL provided.
The default login URL for accessing the WordPress dashboard should be /wp-admin or /wp-login.php, as either of these should work.
For example if we installed WordPress on the root directory of ‘servermanagementco.com’ then our URL would be: http://servermanagementco.com/wp-admin
Installing WordPress Manually on cPanel
In this section we’ll discuss how to install WordPress manually on your Linux/cPanel hosting platform. Again, please note cPanel has an auto-installer available that allows you to easily install WordPress.
If you instead wish to use this auto-installer you can use the ‘Fantasico’ or ‘Softaculous’ features available within your cPanel. If you have your own dedicated server and do not have these options, then these can be added for you as add-ons if you contact our support department.
Step for manual installation below:
-
The first step is you will want to obtain access to the sites directory. This can be FTP Access, FileManager Access, or SSH access.
Note: We recommend FTP access due to the number of files, as FileManager is mainly used for single file access/editing use. We’ll be needing to upload a large number of files which is best done via FTP.
-
Once you have access to the file structure for your website you’ll need to obtain the WordPress core files. To do this you can download the latest version of WordPress here or you can access the URL below to download.
Wordpress download: https://wordpress.org/download/
-
Once you have the WordPress.zip file downloaded onto your local computer go ahead and unzip (uncompress) the WordPress download file into an empty folder that you create on your computer.
You should see all of the WordPress files and folders in the newly extracted directory, as shown in the screenshot below:

-
Now using the file structure access you obtained in Step 1, move over all of the site files for WordPress that you just downloaded (excluding the .zip file) into the folder you want WordPress installed.
For example, if you wish to host WordPress in the root directory then by default the /public_html directory would be used. If you want WordPress hosted in the /wp subfolder you could choose the ‘/public_html/wp’ directory for your site.
-
Now that the site files are in place we need to set up the database that WordPress is going to use since WordPress is a database driven CMS software. You can follow cPanels guide for adding MySQL Databases if needed.
Note: You’ll also want to make sure to map the user to the database, which the same guide URL provided above shows in the section ‘Add a user to a database’.
-
Once the database is setup we need to tell WordPress how to connect to the newly created database. To do this we can rename the ‘wp-config-sample.php’ file in the WordPress installation directory to ‘wp-config.php’ and then update the following code within this file:

For example, if the database we created was called ‘example_db’ with the username of ‘example_admin’ and the password ‘Hg8kL;mn!dRsl&’ we could use the following (see screenshot below).
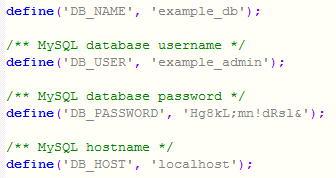
Note: We used ‘localhost’ as the server hostname since on the cPanel environment MySQL is installed on the same server.
Be sure to save your changes to the file, as well as be sure that you successfully renamed the file from ‘wp-config-sample.php’ to ‘wp-config.php’.
-
You should now be able to browse to the URL of your site that you installed WordPress in (If your site is not yet pointing to us you can update your host file for testing purposes) and proceed through the installation steps.
You will be asked for the language to use for your WordPress installation. Choose your language and click ‘Continue’.
You will then be asked for the following information (screenshot below as well):
-
Site Title - The Site Title is displayed in the title bar of a web browser and is displayed in the header for most themes.
-
Username - The administrator user that will be used to login to the WordPress dashboard. We recommend using something unique and not using the common username of ‘admin’ as this can be easily brute forced.
-
Password - The password used for the administrator user. Please be sure to set a very strong password for this dashboard. You can view our guide on setting a strong password if needed.
-
Your Email - This will be the administrator email used within WordPress for sending emails such as password resets, notifications (if any plugins are set up to do so), etc.
-
Search Engine Visibility - Checking this box will add a flag to the site to discourage search engines and other crawlers from indexing the site. This is mainly used when you are not yet ready for your site to be viewable by potential clients or other types of visitors.

-
Once you fill out the form mentioned above and click on ‘Install WordPress’ then you should be ready to go! You should be redirected to a page confirming the setup was successful and a login URL provided.
The default login URL for accessing the WordPress dashboard should be /wp-admin or /wp-login.php, as either of these should work.
For example if we installed WordPress on the root directory of ‘servermanagementco.com’ then our URL would be: http://servermanagementco.com/wp-admin